Search This Blog

Monday, 29 April 2013

Straw-mazing Strawberry Mango Sorbet

I was craving something straw-mazing for dessert. Organic strawberries were cheap today at the grocery store so I bought a couple pounds. They are in season right now and oh so yummy! Strawberries are also very good for your health. They boost immunity and are packed with antioxidants like vitamin C which is cancer-fighting, wrinkle-fighting and great for your beautiful eye's sight. Anti-inflammatory properties make them great for those with stiff joints and arthritis. They help regulate blood pressure, which is good for your heart... and what are strawberries shaped like??? - A heart! And don't forget the two f's - fibre and folate. Fibre is great for digestive health and folate is especially important for expecting mothers or women who are trying to conceive. 

So I had all these fresh strawberries and I thought, 
'what could I blend these with?' 
(I blend everything)...
...Mango! 

I had frozen mango in the freezer, one cup left, the perfect amount. So I blended one cup of frozen mango and 6-7 large strawberries in the blender with two pitted medjool dates... Straw-mazing! 
It was just what I wanted for dessert. 


Straw-mazing Strawberry Mango Sorbet

6-7 big ripe strawberries
1 cup frozen mango
2 pitted medjool dates

Blend all ingredients together in high-speed blender or food processor and enjoy! 

Until next time,
Keep it fresh and fruity! 
Naturally Ashley
xoxo


Sunday, 28 April 2013

Sweet Catalina Salad Dressing

Do you like Catalina salad dressing? Catalina and Ranch used to be my two favorites! 

I was craving a big salad for supper tonight with lots of cremini mushrooms but didn't know what to make for a dressing. So I looked in my fridge to find a red pepper, a tomato, a mango and a lemon. I blended the four ingredients together and it was delish! So tasty and it reminded me a little of Catalina salad dressing. So I googled a Catalina recipe and added a few ingredients to my blended fruit dressing. I added one clove of garlic, one green onion, 2 pitted medjool dates and 1/4 teaspoon of mustard powder. And voila, Catalina dressing for the first time in over a year. It was delicious!


My salad was very sweet and simple: 2 heads of romaine lettuce, one chopped tomato, a container of cremini mushrooms sliced, and 2 chopped and pitted medjool dates. It was the perfect combination for the Catalina dressing. It's made entirely of fresh veggies and fruit, so it's naturally low fat, oil free, dairy-free, gluten-free, raw, vegan yumminess. 

Catalina Salad Dressing

Ingredients:

1 tomato
1 red pepper
1 mango
1 lemon
1 green onion
1 glove of garlic
2 pitted medjool dates
1/4 teaspoon mustard powder

Directions:

  1.  Wash and chop up the tomato, red pepper, mango and green onion and throw in the high speed blender or food processor. 
  2. Squeeze the lemon from one lemon and add in the lemon juice. Try not to get the seeds in.
  3. Remove the pits and chop up two medjool dates and add to the blender/processor.
  4. Toss in the garlic and 1/4 tsp of mustard powder.
  5. Blend on high speed and enjoy!!

I hope you enjoy this as much as I did! What other salad dressings do you like or miss? I will try to make a healthy version of it if you leave a comment below!

Please Like | Share | Comment

Like and subscribe to Naturally Ashley on facebook to receive recipes, motivation and inspirational posts, at https://www.facebook.com/NaturallyAshleyNutrition


Saturday, 27 April 2013

Healthy Sushi: Wasabi Recipe

I love sushi. Nori and other sea vegetables are a great source of iodine. I've made sushi a few times but my family all agrees it tastes better from a restaurant for some reason. I decided to make some at home the other day and went to buy the wasabi and pickled ginger from the grocery store. I checked the ingredients on the wasabi first, sorbitol was the second ingredient! Gross. I know it's only a small amount that you eat but there's no way I was putting that crap in my body. I didn't even have to pick up the pickled ginger because I could clearly see Aspartame written across the bottle. What's with the artificial sweetners?? Do they use these same brands in the restaurants? 


Not willing to give up my sushi I set out to make my own wasabi. I found wasabi powder at the asian food market but there were preservatives in that too so I looked at the two main ingredients: Horseradish and mustard. My next stop was Safeways grocery store to grab some horseradish root. I already had mustard powder at home. This was too easy - I peeled and cut the horseradish root into chunks, and threw it in the blender with the mustard powder, 1 juiced lemon and some water. You could tint it green with spirulina if you want a more authentic looking wasabi paste. 


 It turned out great! It was almost identical to wasabi. It had that POW that I was looking for and I could enjoy my meal, preservative and artificial sugar-free! I was going to make homemade sushi but felt like going out and sharing this awesome wasabi. So I bottled up my recipe and took it to DK Sushi for supper with my sister Nikki and dear friend Lisa. Now what about the ginger you ask?? I brought ginger powder from home, but my next venture will be to try making my own pickled ginger or trying it with some fresh thin slices. Be careful not to inhale the ginger powder like I did! 

You may have also noticed that my sushi is all veggies! I asked the server and he said they add sugar to the rice, so I asked for a rice free roll. He looked at me funny but it was no problem for them to make them rice free for me. I am sorry if I have ruined sushi for anyone, I just thought you should all know what you are eating! Maybe there are restaurants that use organic healthy versions of wasabi and pickled ginger, I suggest you ask the next time you go out or try making your own wasabi at home! 

Wasabi
3/4 cup horseradish chunks (peeled)
1 tsbp mustard powder
1 lemon juiced
1/4 cup water (I added more after)

This makes a big batch so you can share with the whole family. I blended all of the ingredients together in my vitamix on high, but you could also make this in a food processor. I had to add more water as I went. Keep adding water until it's not chunky, but be careful not to add too much or it will become runny.

Monday, 22 April 2013

Chocolate Hair, Cacao Bronzer and Aloe Vera Gel Hair Treatment


I was inspired to try shaking some raw cacao onto my roots this morning after seeing a post from my sister Nikki. She tried using baby powder like a dry shampoo, but found that it was too white for her dark brown hair so she used cocoa powder instead. I rarely eat cocoa/cacao, so this was a great way for me to use up the powder I had in the cupboard. My hair hasn't been washed in a week and I was just about to use aloe vera gel as a mask when I seen the post so I thought I would try this first!


I took about a teaspoon of cacao and sprinkled it onto of my head, gently shaking it throughout my roots. It worked pretty well but it did build up down the middle in my part and you could see the brown powder. I would maybe sprinkle less on next time.  I would also suggest you avoid wearing white or light colors just incase it shakes down and stains! The powder also sprinkled onto my cheekbones so I rubbed it in like a bronzer and it worked pretty good! I am going to try this with carob powder!!

After I was done playing with the cacao, I applied a aloe vera mask using 1/4 cup of aloe vera gel, generously massaging it into my scalp and hair. It was cool and soothing to my scalp, which is still irritated. I let it sit in my hair all morning as I edited photos and had breakfast - 6 bananas blended with cinnamon!

The gel almost evaporated and I wondered if I even needed to rinse it out. But I did and my hair felt really nice. The roots were a little heavy but my scalp was saying THANK YOU! This definitely helped with the irritation.


Here are 4 reasons to try Aloe Vera Gel today:
1. Hair Growth - Aloe vera is a natural treatment that can prevent hair loss and it may even stimulate the growth of new hair! Great to try for both men and women with thinning hair.
2. Natural Shampoo - When you mix coconut milk with aloe vera it becomes a nourishing shampoo, packed with vitamins and minerals that repair strengthen your scalp and hair. You can also add essential oils to boost the potency and add a lovely fragrance. Peppermint oil will help wake you up in the morning and adding lavender oil at night will help you sleep.  
3. Dandruff -  Aloe vera gel is refreshing, and feels cooling as it soothes and moisturizes the scalp. It alleviates itching and  dandruff as well as balances oil production to prevent excess oils or dry scalp.  
4. Conditioning - Aloe vera naturally moisturizes and repairs the hair to make it strong, soft and shiny. I've also ready that it's great for frizz control and doesn't leave you with a buildup that other products may leave behind. 
So now that you know all these great things, you can go buy a bottle from the health food store. It's cheaper than shampoo, and way better for your hair! Next on the list to try - coconut milk! I will keep you posted! 
Stay fresh and fruity, 
Naturally Ashley
xoxo


Monday, 15 April 2013

30-Day No Shampoo Challenge Results

If you have been following me on Facebook or YouTube you may have noticed that I have been doing a 30 day challenge where I have not used any products like shampoo or conditioner in my hair. You also refrain from using hairsprays, gels and de-tanglers but I wasn't using these products to begin with, so it was just the shampoo and conditioner I had to do away with. I started this challenge as an experiment to see if shampoo was the cause of my irritated, dry itchy scalp. I can't remember the last time I had a healthy, flake-free scalp for more than a week. (except for when I spent 10 days in Hawaii!) 

I exhausted every possible product over the years starting with expensive salon shampoos and gluten-free shampoos, moving to paraben and sulphate-free, then anti-dandruff shampoos like head and shoulders, to organic, then to vegan with no success lasting longer than a week. I was tired of wasting my money on these products and knew there had to be a better way.

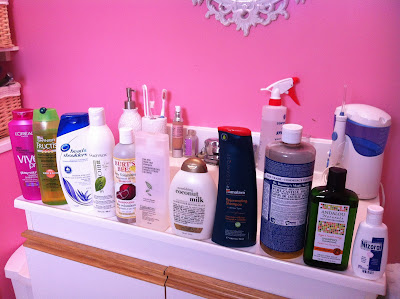
I just looked under the sink and counted 11 different shampoo bottles plus their conditioner counterparts

I was inspired by 40 Below Fruity video on facebook to try this for myself.  She hasn't washer her hair in two years and it looks beautiful. I researched other YouTube videos and found that going 'poo-free' is trending and that it is working for people with all different hair types whether you have corkscrew curls or poker-straight hair like me. 

Check out the BSV rinse video here -->http://www.youtube.com/watch?v=y6u_KHpGauk

I started by washing my hair with a baking soda solution and rinsed it with apple cider vinegar, as suggested by 40 Below Fruity and other poo-free challenges on YouTube. The first time went over great - I couldn't believe how nice my hair turned out. I left it for five days and tried the BSV rinse again, with less success. My hair was overproducing oils and I had to wear a scarf/headband to hide the slick-ness. I knew this was to be expected as my head was adjusting to being poo-free and it inspired me to try other things like diluted food grade hydrogen peroxide, pureed bananas and avocado! It wasn't always pretty but I am so happy I tried this.

Banana Mask
Click here to watch the banana mask demo --> http://www.youtube.com/watch?v=qG4ZamUqE1o


Here are the results of my 30-Day No Shampoo Challenge:


My hair is gorgeous. I love the way it feels, the natural shine and the reduced irritation of my scalp.
After 30 days my hair is not overproducing oils like it used to, and the BSV rinse works well every 5 days or as needed. As for my dry scalp, I will continue to use bananas and avocados to moisturize and treat the flakies. I can already see great improvements and feel that if I continue on this path it can only get better.

One downside is that my hair doesn't hold a curl as well as it used to. My hair is poker-straight and had trouble holding a curl before, unless I used a flat iron to curl my hair. Now the ringlets don't last, but I actually like how they fall into loose beachy-looking waves. And I probably shouldn't be using that intensity of heat on my hair anyways if I'm going to all this trouble to restore it's health. I think the curls don't last as a result of my hair being more healthy. I have noticed over the years that the more damaged my hair was the more curl it would hold. It's also slightly heavier, weighing the curls down. Bottom line -I'd rather my hair be healthy than curly so I guess that's a no-brainer.

Got knots? - apple cider vinegar - it's THE best de-tangler for your hair. Even if you don't want to go poo-free I recommend trying the apple cider vinegar for your locks. The vinegar smell goes away quickly and you are left with easy to comb, shiny hair. Apple Cider Vinegar has made my tangled locks the easiest hair to comb in all of Canada! Seriously!

And if the Baking Soda isn't cutting the grease, try a pureed - banana mask - It may leave some sugar flakes but it absorbs the excess oils. Rinse well with water then use the apple cider vinegar solution to de-tangle.

My hair is also not as static-ky, which is nice, I don't enjoy it sticking to the side of my face and getting in my mouth!

List of things I tried in 30 days:

  • Baking soda and water solution (2 tbsp mixed with a little water in ketchup-type bottle) with an apple cider vinegar rinse (4 tbsp mixed with 1/2 cup water in the same bottle). This worked great the first time, but lost its power in the 2nd and 3rd week. Now that my hair has adjusted it works well again. 
  • Epsom Salts - I was inspire to try this as a result of how great my hair feels after I've swam in the ocean. It didn't really do anything that I noticed but I will try this again later on and see. 
  • Food grade hydrogen peroxide - a small/specific amount diluted in the bath water that really cleaned out the gunk, leaving my hair more bouncy and curly but failed to remove any of the excess oil. ***warning, this can be dangerous if not done properly and extremely harmful if this gets in your eyes.
  • Banana hair mask - left on 1 hour -worked great for moisturizing scalp and removed excess oils better than the baking soda solution. I rinsed this with the apple cider vinegar to detangle and remove the sugar. I was left with some sugar flakes and it loosened the natural flakes on my head. I just wore a headband for a few days until I washed again with BSV. 
  • Avocado mask - left on 30 minutes - moisturizing scalp and roots of hair. Worked best for flakes and itchy-ness. 
  • Coconut oil in ends of hair - used this to tame any fly-aways from winter static


So now I can toss all those bottles and know that my hair is more beautiful and healthy the Naturally Ashley way using Baking Soda, Apple Cider Vinegar and Bananas! (except the Dr. Bronner's - I use it to clean everything, great for bathtubs, body wash and laundry!) 
I challenge you to try 30 days poo-free! The first month is tough but so worth it. I'm looking forward to sticking with this and seeing how it goes.

Thanks for reading!
Lots of sweet, fruity love, 
Naturally Ashley

Sunday, 14 April 2013

5 Ways to Add Kale to Your Life!


Why I eat Kale:
I eat greens everyday, and one of my favorites is kale!
Learning to incorporate dark, leafy greens into your diet is essential for a healthy body and immune system. Eating lots of greens naturally crowds out the foods that you don't want to be eating. Our cells are made up of the foods we eat. For example, if you eat potato chips you will most likely experience cravings for potato chips. When you put good things into your body, your cells crave good foods.

Greens like kale are full of antioxidants, fibre, vitamins, and minerals that help strengthen the blood and respiratory system. They are also high-alkaline foods. The alkaline minerals in our bodies are used to neutralize acidic conditions caused by the environment. I have noticed a huge improvement in my hair, skin and nails since I started eating more greens and can notice a difference if I miss them for more than one or two days.


Nutritionally, greens are very high in calcium, magnesium, iron, potassium, phosphorous, zinc and vitamins A, C, E and K. They are loaded with fiber, folic acid, chlorophyll and many other micronutrients and phytochemicals. Although choosing organic is recommended, eating non-organic greens is still preferable to not eating any greens at all! 

So how do you incorporate more greens like KALE into your diet?

5 ways to add Kale to your life:

1. Sweet Green Smoothies!
Add 2-4 stalks of dark leafy green kale, stems removed, and blend with coconut water(or filtered water) and your favorite fruit! Sweet fruit works best to mask the taste for beginners, like mangos, bananas, pineapple and dates!

2. Juice it!
Juicing kale gives you a straight shot of nutrients that will give you immunity and more energy than your morning cup of coffee! Removing the fibre allows this powerhouse of antioxidants to be absorbed straight into your bloodstream for lasting energy without the crash that typically follows your caffeine binge. I like to make a green juice using 4 stalks of kale, de-stemmed, one apple, one lemon and a cucumber! It tastes better than you think!

3. Kale Wraps
Those lettuce wraps are pretty popular right now, showing up in restaurants, and you can make them using Kale! The big leaves allow you to fill them up with your favorite filling. You can then rolls and make them into a wrap or use them like a taco shell. My favorite filling is mushrooms, tomato, avocado, onion and homemade taco seasoning - delicious!

4. Marinated Kale
Wash, de-stem and cut up a head of kale. Toss it in a bowl with your favorite marinade recipe or salad dressing. You can use italian, greek, or make your own with olive oil and lemon with some salt and pepper. Let the kale marinate for the afternoon or an hour, and throw in your favorite veggies to make a tasty salad for lunch, or you can saute the marinated kale to make a lovely side dish at supper. If you want a crunchy snack - try baking or dehydrating the kale to make kale chips! Pizza kale chips are my favorite. You can use pizza sauce to marinate pieces of kale or so a homemade sauce. Recipe at the end of post!

5. Baby Kale
So you've tried kale, and you just don't like it, but you want the benefits of this nutrient-dense leafy green- then you can try baby kale! It's usually pre-washed and pre-packaged in the grocery store, making it easy to throw into smoothies and fast to make salads with. It has a milder taste and has the added benefit of being easier to digest!

So what have you got to lose?? Go out and buy a bunch of kale today! There are hundreds of recipes on the internet using this trending vegetable right now. Even though KALE is sooo good for you, it's still important to eat a variety of greens for balanced nutrition. When you are done trying kale, go out and get some spinach, romaine, swiss chard or arugula! You're body will LOVE you for it.


Pizza Kale Chips 


Ingredients:
2 bunches of Kale - washed with stems removed and torn into bite size pieces
1/4 cup tahini (sesame seed paste)
1 roasted red pepper (or fresh)
3-4 sundried tomatos (soaked an hour)
3 Tbsp nutritional yeast (optional, *gives cheesy flavor)
1 Tbsp pizza seasoning  (I used fresh basil and oregano)
1 clove of garlic
1/2 tsp sea salt

Directions:
1. After washing and removing the stems of the kale, place in a large bowl and set aside.
2. Place all ingredients *except kale* in a food processor and mix well, scraping sides.  Should form a paste thicker than traditional pizza sauce. Add 1 Tbsp water if sauce is too thick.
3. Pour sauce onto kale pieces and massage into leaves using your hands.
4. Spread kale pieces onto cookie sheet or dehydrator trays lined with parchment paper, greased with a thin layer of olive oil.
5. If using and oven: Bake at the lowest temperature setting for your oven for about 20 minutes ***keeping a close watch! They burn quickly.***
If using a dehydrator: dehydrate for about 8 hours at 115 degrees, checking for desired crispiness.
Enjoy your healthy, crunchy pizza snack! 


Tuesday, 9 April 2013

Taco Salad! (Low Fat, Raw Vegan- translation - Healthy!)

Tonight's supper is a taco salad inspired by Live Love Fruit's Raw Vegan, Low Fat Tacos! 
Click the link for the original recipe here -----> Raw Edible's -Raw Vegan Low Fat Tacos

I've made these twice, and tonight I'm putting a spin on the recipe and turning it into a Taco Salad! The first time I made them I let the zucchini and mushrooms marinate at room temp, and the second time I put them in the dehydrator. I liked them room temperature better and found the dehydrator made the mixture a little watery. So for my Taco Salad I'm letting them marinate on the counter. You can also eat it right away if you don't have any patience like me!


I chopped up some of my favorite taco veggies to go along with my taco 'meat' and tossed them all together in an epic salad! I didn't want it to end. I love finding recipes like this. If you were to ask me if I miss eating anything right now - I'd say no way! I changed the recipe a bit to suit my taste and what I had in my kitchen.

Taco Salad

Taco 'Meat'
1 medium zucchini - chopped into little cubes
1 cup of cremini mushrooms - chopped finely

Taco Dressing
3 medjool dates, soaks in 1/4 cup water for 1/2-1 hour until soft
1 green onion chopped
1 garlic clove
1tbsp chili powder
1 tsp cumin
1/2 tsp bell pepper flakes
1 tsp paprika
1 tsp corriander
Juice of 1/2 lime

When the dates are soaked and soft - blend with the water and remaining ingredients. You may need to add more water to make a medium-thick sauce.

Place the zucchini/mushroom mixture in a medium bowl and pour your Taco Dressing over top, stirring to even coat all the veg. Set aside for 30 minutes - a half hour.

While waiting, I washed and chopped up:
- a head of romaine lettuce
- a container of cherry tomatoes
- a red or yellow bell pepper
- two more green onions or red onion

You can also add:
- grated carrot for a 'cheesy' look
- avocado slices
- fresh organic corn

After your marinated zucchini and mushrooms are ready, make your salad to your liking and enjoy your zesty, healthy meal.
Disclaimer: You might not want to share this with others -I ate the whole thing myself and growled at the dogs when they tried to come near!


Lots of sweet fruity love, 
Naturally Ashley
xo

Check out Live Love Fruits Facebook page:
http://www.facebook.com/livelovefruit?fref=ts

Find me on Facebook:
http://www.facebook.com/naturallyashleynutrition

Subscribe to my YouTube feed:
http://www.youtube.com/user/naturallyashleyNASH


Saturday, 6 April 2013

Bananarific Hair Mask - 2 Videos

I'm sure it's no shock to anyone that my next venture in my Shampoo-free challenge was to try a banana hair mask! I'm actually shocked that it took me this long to realize it! So happy with the results, here's how it went:

Banana Hair Mask
What did I do Friday night? You won't be surprised to hear that I had a date with a bowl of puréed bananas. My friend Pam sent me a message talking about different natural hair treatments and of course bananas was one of them. Bananas are good for everything! I should have known that they would take care of my dry scalp issues. 

This is a demo of me using the banana mask:


I pureed around 5 ripe bananas in the blender, which ended up being too much. I would do three next time. It went on easy and I was able to really massage it in. The I left it on for an hour before rinsing.
I loved the smell and the fact that I could eat it if I felt like a snack! 

This video is the Banana Mask Results: 


I rinsed it out an hour later to find that there was no way that I was getting a comb through it. It clicked that I should do an apple cider vinegar rinse...I didn't want to loose the sweet smell of bananas, but I knew the vinegar would work to detangle my hair.  I could also see that I hadn't rinsed all of the banana out anyways. It turns out that bananas are difficult to rinse out of your hair and I still have some tiny flakes. Besides the sugar flakes, this was a huge success! I absolutely love the way my hair feels. The banana worked better than the baking soda to cut the oils and my hair is so light and bouncy today!  

Bananas for the WIN, yet another reason to love them. 
(seriously, why didn't I think of this before??)


Lots of love and bananas, 

Naturally Ashley
xo

To follow my no shampoo challenge check out my Youtube account and Subscribe! http://www.youtube.com/user/naturallyashleyNASH

And check me out on Facebook too:


Wednesday, 3 April 2013

Day 19 - No Shampoo Challenge

So it's day 19 already and I'm getting used to my hair being a little more shiny than normal. I've been wearing it half up or in ponytails lots but I can see the light at the end of the tunnel. My hair is still overproducing natural oils, just like your face does when you quit using cleansers. It's from all those years of stripping the natural oils with harsh shampoos. I'm not sure how long it's going to take to balance out but I'm willing to stick with it. My hairdresser Luc told me yesterday that our hair is shiny in its natural state, imagine a horses coat - not greasy, but shiny. This is my new goal - to have healthy, shiny hair. With no products! Thanks Luc for the new perspective! I think I'll be keeping this up for more than 30 days! 

Click here ---> to watch my YouTube video for the full update


Naturally Ashely
xoxo

Tuesday, 2 April 2013

Dairy-Free Creamy Mushroom Soup. Heated in my Vitamix!

I was inspired to make this Creamy Mushroom Soup recipe last week by my cousin Sheena and my Aunty Sandy. They have been busy using their new Vitamix blenders to make soups and smoothies, and posted a pin on facebook of a yummy mushroom soup recipe that they had just made. (To see the original recipe click on the link--> http://pinterest.com/pin/193162271490423482/)

The recipe looked great, but I wanted to try it 'uncooked' in my Vitamix blender.  I also made a few other substitutions to fit my diet and use up what I had in my fridge like:

~exchanging the walnuts and olive oil for a 1/2 of an avocado. The avocado made it sooo creamy!

~I made it lower sodium by using water instead of broth and adding celery to satisfy my craving for salt. If you really like your salt, try the celery salt instead of the stalks. I know I really have to watch my sodium intake or I swell like a balloon!

~You may notice that I didn't use thyme but that's only because it's the only herb I didn't have in my kitchen! So by all means, add it if you have it and think that it will add to the flavor of your homemade soup. 

Did I mention how easy this was to make? It only took me ten minutes, and I couldn't have been more satisfied with the results. I can't remember the last time that I had mushroom soup! So happy to have this recipe in my life. Thank you Sheena and Sandy! xo

Naturally Ashley's Creamy Mushroom Soup


Ingredients:
2 cups of chopped mushrooms (cremini or white button are nice)
1 small zucchini peeled and chopped
1/2 ripe avocado
4 green onion tops (the chives)
2-3 garlic cloves
2 small stalks of celery or 1 large stalk (or 1 tsp celery salt)
1/2 cup water


Directions: 

1. Wash and dry your mushrooms. Chop them up and set aside 3/4 of a cup of mushrooms. 
2. Add the other 1 1/4 cup mushrooms ant the rest of the ingredients into your Vitamix or high-speed blender. Blend on high until very smooth and creamy. I blended mine for 3-4 minutes to heat the soup - you can see it start to steam inside the blender. 

3. Pour your creamy mushroom soup into a bowl or two bowls. Add remaining mushrooms and stir them in with a spoon.
4. Enjoy this raw/vegan cream of mushroom soup immediately, while it is still nice and warm from the blender!

Thanks Ladies, 
Lots of love, smiles and bananas,
Naturally Ashley

Check out my facebook page at: 
www.facebook.com/NaturallyAshleyNutrition 

Watch my YouTue Vids at:
http://www.youtube.com/user/naturallyashleyNASH